Build a Simple Automatic Plant Watering System using Arduino
Project Hub
/Basic Analog & Power Electronics/Power Supplies & Voltage Regulators/Build a Simple Automatic Plant Watering System using Arduino
Beginner
ARDUINO
₹1,500 – ₹5,000
3 – 6 Hours
Partial Kit
Build a Simple Automatic Plant Watering System using Arduino
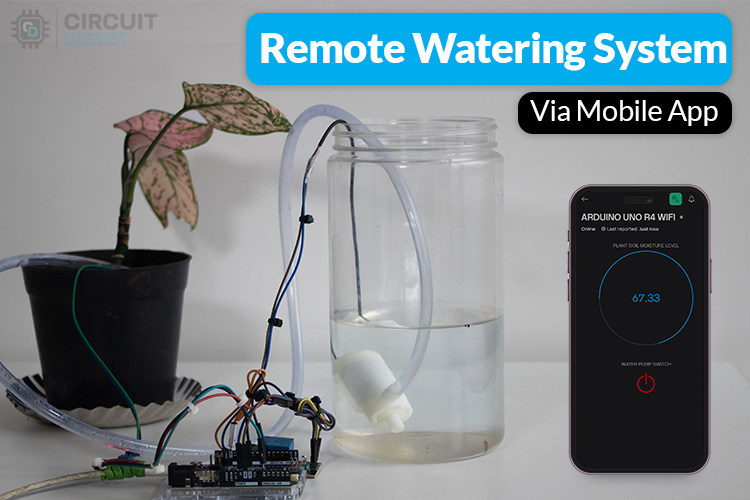
A DIY automatic plant watering system using an Arduino UNO R4 WiFi, soil moisture sensor, and water pump, featuring Blynk mobile app integration for remote monitoring and control.
This project is sourced from another site, not written by us — this list is our best match of their components against what we stock, not a verified bill of materials. Always check the original blog (linked above) for the actual parts list before buying.
This automated plant watering system operates through an integrated loop of sensing, processing, and actuation managed by the Arduino Uno R4 WiFi. The FC-28 soil moisture sensor continuously measures the volumetric water content in the soil by evaluating changes in electrical conductivity between its probe tracks, outputting an analog voltage signal to the microcontroller. The Arduino Uno R4 WiFi processes this incoming data against a predefined moisture threshold. When the soil dries out beyond the acceptable limit, the microcontroller changes the digital output state connected to the 5V single-channel relay module. This relay acts as an electrically operated switch, closing the circuit to power the 5V water pump from the external power supply (via a 12V DC jack power adapter or 5V USB-C power adapter). As the pump runs, it delivers water to the plant until the FC-28 sensor detects sufficient moisture recovery, prompting the Arduino to deactivate the relay and stop the pump. Additionally, because the Arduino Uno R4 WiFi features onboard wireless connectivity, it communicates with the Blynk IoT platform and mobile app. This allows the system to transmit real-time moisture telemetry to a personal computer or smartphone, enabling remote monitoring, manual overrides, and automated status updates without requiring physical proximity to the hardware setup.
Why Build This
Develop practical undergraduate-level systems integration experience by combining analog environmental sensors, electromechanical relays, and cloud-based IoT software.
Implement real-time remote monitoring and automation architectures applicable to modern smart agriculture and greenhouse management.
Gain hands-on engineering competency in power distribution, signal processing, and microcontroller-based actuator control.
Real-World Application
Automated home gardening, indoor plant care, and small-scale agricultural greenhouse irrigation.
Skills You'll Learn
Analog-to-digital conversion
relay actuation
IoT cloud platform integration
sensor signal conditioning
DC motor power management
Safety Precautions
Ensure proper separation and isolation of low-voltage control circuits from external water sources and high-current power supplies to prevent electrical hazards.
Technology Tags
ARDUINO
IOT
BLYNK
SOIL MOISTURE SENSOR
RELAY MODULE
WATER PUMP
WI-FI
Frequently Asked Questions
The sensor module typically has analog and digital output pins. Connect the analog output pin to one of the analog input pins on the Arduino to read continuous moisture levels, and supply appropriate power and ground connections from the board.
It is generally not recommended to power a water pump directly from the microcontroller's onboard regulator because inductive loads can cause voltage spikes and exceed current limits. Use an external power supply routed through the 5V single-channel relay module to switch the pump safely.
The Arduino Uno R4 WiFi utilizes its built-in Wi-Fi capabilities to connect to your local wireless network, allowing it to interface with the Blynk cloud platform using authentication tokens provided by the Blynk software environment.
Gallery
This page is part of Kitkraft's Project Hub — a curated collection of electronics & robotics projects gathered from the maker community to help students and hobbyists discover and learn to build. Kitkraft does not claim authorship of the original project, and makes no representation as to the accuracy, completeness or safety of third-party source material. The summary and "How It Works" explanation above are AI-generated, rewritten with reference to the original tutorial — not a reproduction of it. Full credit and a direct link to the original source are provided above. If you're the original creator and have a concern about how your work is represented here, please contact us and we'll address it promptly.
Kitkraft Project Hub — curated from the maker community, credited at the source.
 5V 1 Channel Relay Module
Rs. 45.00
 Soil Moisture Sensor
Rs. 75.00
 Jumper Wire 10 Pin Male To Male 20cm
Rs. 45.00
 MB102 Adjustable Breadboard Power Supply Module (3.3V & 5V) for Arduino & Raspberry Pi
Rs. 139.00
 400 Points Mini Solderless Prototype PCB Breadboard High Quality
Rs. 89.00
 Jumper Wire 10 Pin Male To Female 20cm
Rs. 45.00


