Build Your Own IR Audio Communication System at Home
Project Hub
/Basic Analog & Power Electronics/Analog Amplifiers & Signal Conditioning/Build Your Own IR Audio Communication System at Home
Intermediate
ANALOG / DISCRETE
< ₹500
3 – 6 Hours
Partial Kit
Build Your Own IR Audio Communication System at Home
An intermediate-level DIY project that builds a wireless IR audio communication system using analog components like the LM386 amplifier and LM358 op-amp.
This project is sourced from another site, not written by us — this list is our best match of their components against what we stock, not a verified bill of materials. Always check the original blog (linked above) for the actual parts list before buying.
This list includes a generic resistor set
as a placeholder — it is not matched to the exact value or part number this circuit needs. The correct one is specified on the original source page linked above; check it before buying.
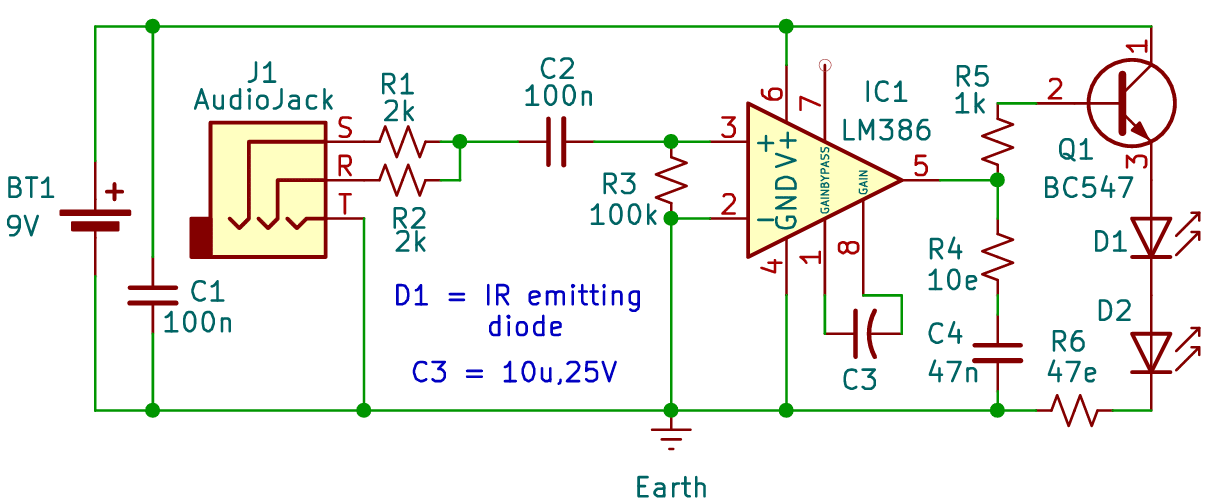
The Infrared (IR) Audio Communication System operates by converting an incoming audio signal into modulated light waves that travel through free space before being converted back into audible sound. At the transmitter stage, an audio signal enters through an audio jack and is coupled using capacitors, such as the 100nF and 10µF capacitors, to block direct current while allowing alternating audio frequencies to pass. The core of the amplification and driving process relies on the LM386 audio power amplifier. Powered by a 9V PP3 battery, the LM386 boosts the weak incoming audio voltage to a level sufficient to drive current fluctuations through the circuit. Resistors ranging from 47Ω to 100kΩ are utilized to set proper biasing, gain levels, and operating points for the active components, while the 10Ω resistor and 47nF ceramic disc capacitor form a Zobel network to ensure amplifier stability. This amplified audio current is then routed through a set of infrared emitting diodes (D1 and D2). As the audio waveform varies, the intensity of the invisible infrared light emitted by the diodes fluctuates in real-time, effectively riding the audio signal on an optical carrier wave. Because this project is constructed on a breadboard or PCB using an IC base and connecting jumper wires, the physical layout allows for easy signal path tracing. Although no dedicated microcontroller or software is required, the analog modulation scheme demonstrates fundamental principles of optical wireless data transmission using purely discrete and linear electronics.
Why Build This
Explore practical analog signal conditioning and audio amplification using the industry-standard LM386 integrated circuit.
Investigate free-space optical communication by modulating invisible infrared light with real-time audio signals.
Gain hands-on experience building discrete analog circuits without relying on pre-programmed microcontrollers or digital software.
Real-World Application
Secure room-to-room communication, assistive listening systems in theatres and conference halls, wireless headphone systems, and environments where radio-frequency signals are restricted or may cause interference, such as hospitals and laboratories.
Skills You'll Learn
analog audio amplification
infrared optical transmission
circuit biasing and impedance matching
capacitor coupling and decoupling
stability compensation via Zobel networks
breadboard prototyping
Safety Precautions
No specific precautions noted for this build — always follow general electronics safety practices.
Technology Tags
INFRARED
IR COMMUNICATION
AUDIO AMPLIFIER
LM386
LM358
ANALOG ELECTRONICS
WIRELESS AUDIO
LI-FI PROTOTYPE
Frequently Asked Questions
No, this is a completely analog circuit built with discrete components and an LM386 amplifier, requiring zero programming or software setup.
The circuit is designed around the voltage and current characteristics of a standard 9V PP3 battery to properly power the LM386 amplifier and bias the IR LEDs.
Different capacitors serve distinct roles; electrolytic capacitors like the 10µF are typically used for large-value bulk filtering and audio coupling, while ceramic disc capacitors like the 100nF handle high-frequency decoupling and noise suppression.
Gallery
This page is part of Kitkraft's Project Hub — a curated collection of electronics & robotics projects gathered from the maker community to help students and hobbyists discover and learn to build. Kitkraft does not claim authorship of the original project, and makes no representation as to the accuracy, completeness or safety of third-party source material. The summary and "How It Works" explanation above are AI-generated, rewritten with reference to the original tutorial — not a reproduction of it. Full credit and a direct link to the original source are provided above. If you're the original creator and have a concern about how your work is represented here, please contact us and we'll address it promptly.
Kitkraft Project Hub — curated from the maker community, credited at the source.
 10pcs - 220 ohm 1/4 W Resistor Set
Rs. 39.00
 Jumper Wire 10 Pin Male To Male 20cm
Rs. 45.00
 400 Points Mini Solderless Prototype PCB Breadboard High Quality
Rs. 89.00
 MB102 Adjustable Breadboard Power Supply Module (3.3V & 5V) for Arduino & Raspberry Pi
Rs. 139.00
 Jumper Wire 10 Pin Male To Female 20cm
Rs. 45.00


