Project Hub
/Basic Analog & Power Electronics/Power Supplies & Voltage Regulators/Building Humanoid Robotic Arm at Home
Advanced
ARDUINO
Project Specific
6 – 12 Hours
Partial Kit
Building Humanoid Robotic Arm at Home
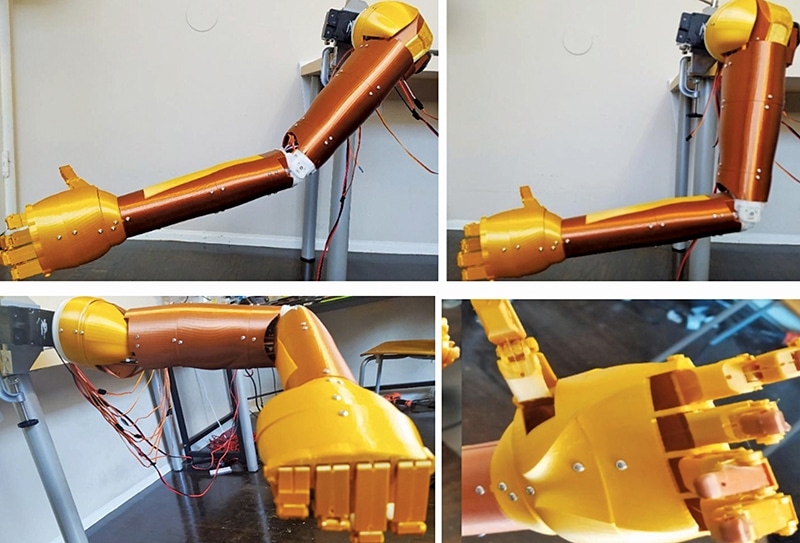
Learn how to build a life-size humanoid robotic arm at home featuring eight degrees of freedom using 3D-printed parts and servo motors controlled by an Arduino.
This project is sourced from another site, not written by us — this list is our best match of their components against what we stock, not a verified bill of materials. Always check the original blog (linked above) for the actual parts list before buying.
The humanoid robotic arm system is controlled primarily by an Arduino board, such as the Arduino Uno or Mega 2560, which acts as the central processing unit running code developed in the Arduino IDE. To achieve eight degrees of freedom, the system uses a combination of micro servos (like the SG90 or MG90S) for lighter joints and high-torque servos (such as the 25kg·cm models and DH03-X/ASME-MRB) for heavy-load joints like the shoulder and elbow. Because managing numerous pulse-width modulation (PWM) signals directly from a microcontroller can be complex, an optional PCA9685 servo driver can be integrated via I2C communication to offload PWM generation. Mechanically, these actuators are mounted into 3D-printed structural parts that form the skeletal frame of the arm, connected securely using wires and proper connectors. Power distribution is a critical aspect of the circuit functionality: a stable, regulated 5V power supply powers the sensitive logic components including the Arduino and microcontrollers, while a separate, robust 12V/24V power supply rated for 20A to 30A supplies the substantial current demanded by the high-torque servo motors under load. Together, the software commands translate into precise electrical pulses that drive the motors, causing the mechanical joints to articulate smoothly.
Why Build This
Gain practical industry-relevant experience in assembling and programming full-scale humanoid robotic systems and collaborative robots (cobots).
Develop technical competencies applicable to designing assistive devices and automated mechanical manipulators using 3D-printed components.
Master advanced power distribution techniques by integrating separate high-amp power sources for heavy-duty industrial-grade servo motors.
Real-World Application
Full-scale humanoid robots, collaborative robots (cobots), assistive devices, and intelligent robotic arm automation.
Skills You'll Learn
PWM signal generation
servo motor control
power distribution management
I2C communication
microcontroller programming
mechanical assembly of 3D-printed parts
Safety Precautions
Ensure a stable regulated 5V power supply for the microcontroller and separate adequate high-amp power supplies for the high-torque servo motors to prevent component damage or electrical hazards.
Technology Tags
HUMANOID ROBOTICS
3D PRINTING
SERVO MOTORS
ARDUINO
PWM CONTROL
MECHANICS
EMBEDDED SYSTEMS
Frequently Asked Questions
High-torque servos draw significant current (up to 20A-30A at 12V/24V) when moving under load. Drawing this power through the Arduino or sharing a single low-amp supply would cause voltage drops, leading to microcontroller resets, erratic behavior, or permanent component damage.
The PCA9685 is listed as optional because an Arduino Mega has enough hardware PWM pins to drive several servos directly; however, using the PCA9685 simplifies wiring and saves processing overhead by handling up to 16 channels over I2C.
You will need the Arduino IDE installed on your computer to write, compile, and upload the control sketches to your Arduino board (Uno or Mega 2560).
Gallery
This page is part of Kitkraft's Project Hub — a curated collection of electronics & robotics projects gathered from the maker community to help students and hobbyists discover and learn to build. Kitkraft does not claim authorship of the original project, and makes no representation as to the accuracy, completeness or safety of third-party source material. The summary and "How It Works" explanation above are AI-generated, rewritten with reference to the original tutorial — not a reproduction of it. Full credit and a direct link to the original source are provided above. If you're the original creator and have a concern about how your work is represented here, please contact us and we'll address it promptly.
Kitkraft Project Hub — curated from the maker community, credited at the source.
 TowerPro SG90 Mini Servo – 180 degree Rotation – Standard Quality
Rs. 179.00
 MB102 Adjustable Breadboard Power Supply Module (3.3V & 5V) for Arduino & Raspberry Pi
Rs. 139.00
 Jumper Wire 10 Pin Male To Male 20cm
Rs. 45.00
 400 Points Mini Solderless Prototype PCB Breadboard High Quality
Rs. 89.00
 Jumper Wire 10 Pin Male To Female 20cm
Rs. 45.00


