This project is sourced from another site, not written by us — this list is our best match of their components against what we stock, not a verified bill of materials. Always check the original blog (linked above) for the actual parts list before buying.
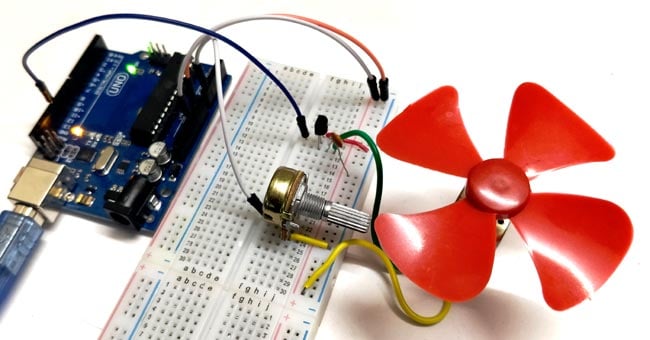
This project enables smooth rotational speed control of a DC motor using an Arduino UNO and a 100k ohm potentiometer. The system functions by reading an analog voltage from the potentiometer, which is connected to one of the Arduino's analog input pins. As you turn the physical knob of the potentiometer, the internal analog-to-digital converter (ADC) on the microcontroller translates the varying voltage into a digital value ranging from 0 to 1023. The Arduino processes this numerical value and maps it to a Pulse Width Modulation (PWM) duty cycle, typically spanning from 0 to 255. This resulting PWM signal is then outputted from a digital pin on the Arduino to the base of a 2N2222 transistor via a breadboard setup. Because the Arduino's digital pins cannot supply enough direct current to drive a motor safely, the 2N2222 transistor acts as a solid-state electronic switch. By rapidly switching on and off at a high frequency determined by the PWM duty cycle, the transistor regulates the average amount of electrical power delivered to the DC motor, allowing you to seamlessly adjust its speed from a complete stop to maximum velocity. A 0.1uF capacitor is also included in the circuit layout to help stabilize power and filter out high-frequency electrical noise generated by the motor's brushes, ensuring reliable operation throughout the assembly.
Why Build This
Build a foundational robotic drivetrain or wheeled chassis with adjustable movement speeds for autonomous navigation experiments.
Understand how microcontrollers interface with physical user input devices like potentiometers to dynamically alter hardware outputs.
Learn the basics of motor actuation and power regulation, which serve as core building blocks for DIY electric vehicles and automated machinery.
Real-World Application
Variable speed drives, robotics locomotion control, electric vehicle throttle systems, and industrial fan speed regulation.
Skills You'll Learn
PWM signal generation
analog sensor reading
transistor switching basics
basic circuit prototyping on a breadboard
microcontroller GPIO utilization
Safety Precautions
Ensure motors are powered correctly and use appropriate flyback diodes or external power supplies when driving heavy inductive loads to prevent damaging the microcontroller.
Technology Tags
ARDUINO
PWM
POTENTIOMETER
DC MOTOR
TRANSISTOR 2N2222
ADC
MICROCONTROLLER
Frequently Asked Questions
It is generally not recommended to power motors directly from the Arduino 5V pin because motors draw significant current, which can cause voltage drops, reset the microcontroller, or damage the onboard voltage regulator. Always use an appropriate external power supply for the motor while sharing a common ground with the Arduino.
The Arduino's digital output pins provide very low current, which is insufficient to drive a DC motor directly. The 2N2222 transistor acts as a switch controlled by the Arduino, allowing a larger current from an external source to pass safely through the motor.
DC motors produce electrical noise and voltage spikes when their internal brushes spark against the commutator. The 0.1uF capacitor helps filter out this high-frequency noise, preventing it from interfering with or resetting the Arduino.
Gallery
This page is part of Kitkraft's Project Hub — a curated collection of electronics & robotics projects gathered from the maker community to help students and hobbyists discover and learn to build. Kitkraft does not claim authorship of the original project, and makes no representation as to the accuracy, completeness or safety of third-party source material. The summary and "How It Works" explanation above are AI-generated, rewritten with reference to the original tutorial — not a reproduction of it. Full credit and a direct link to the original source are provided above. If you're the original creator and have a concern about how your work is represented here, please contact us and we'll address it promptly.
 Arduino UNO R3 Board (Compatible) – ATmega328P Microcontroller with USB Cable
Rs. 999.00
 3–6V R140 DC Motor (High-Speed DIY & Toy Motor)
Rs. 49.00
 MB102 Adjustable Breadboard Power Supply Module (3.3V & 5V) for Arduino & Raspberry Pi
Rs. 139.00
 Jumper Wire 10 Pin Male To Male 20cm
Rs. 45.00
 400 Points Mini Solderless Prototype PCB Breadboard High Quality
Rs. 89.00
 Jumper Wire 10 Pin Male To Female 20cm
Rs. 45.00


