Design and build a Raspberry Pi 18650 Li-ion Battery HAT to make your projects portable
Design and fabricate a custom Raspberry Pi HAT featuring an 18650 Li-ion battery charger and boost converter to provide a portable, uninterruptible power supply for your Pi projects.
This project is sourced from another site, not written by us — this list is our best match of their components against what we stock, not a verified bill of materials. Always check the original blog (linked above) for the actual parts list before buying.
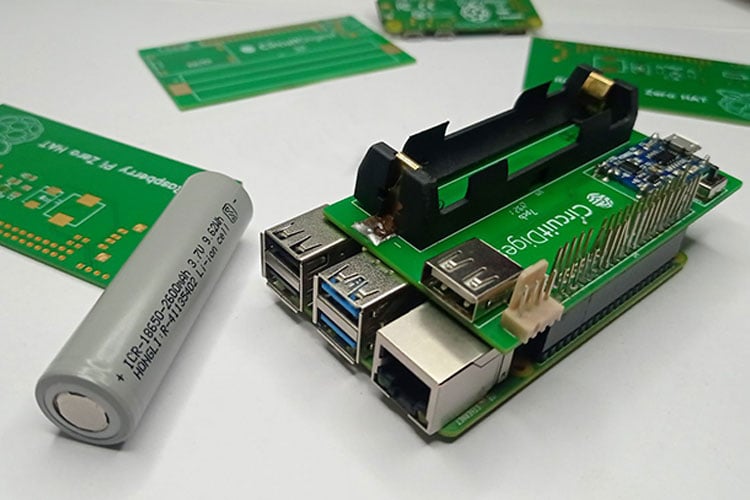
This project integrates a power management and conversion circuit directly onto a custom PCB shaped as a Raspberry Pi HAT. At the core of the system is an 18650 Li-ion battery, secured in a dedicated battery holder, which supplies a nominal 3.7V power source. To safely charge and maintain the cell, a TP4056 module is incorporated, taking power from an external source via a USB female jack to manage the constant-current and constant-voltage charging cycle of the lithium-ion chemistry. Because a standard single-cell Li-ion battery operates between roughly 3V and 4.2V, its output is too low to directly power a Raspberry Pi or Raspberry Pi Zero 2 W, which requires a steady 5V supply. To bridge this gap, the circuit uses an MT3608 IC-based boost converter topology. Working in tandem with peripheral surface-mount devices—including an inductor to store and release magnetic energy, a Schottky diode to prevent reverse current flow, and various resistors and capacitors for feedback regulation and filtering—the MT3608 steps up the fluctuating battery voltage to a stable 5V output. A slide switch allows the user to manually control power delivery to the system, enabling a portable and self-contained power solution for embedded computing tasks.
Why Build This
Develop autonomous field robotics and remote IoT nodes that operate completely free from wall outlets.
Implement a custom hardware power solution featuring integrated charging and boost conversion for embedded systems.
Design an uninterruptible power supply (UPS) backup to protect Raspberry Pi systems against unexpected power loss.
Real-World Application
Portable Raspberry Pi projects, remote IoT nodes, field robotics, and uninterrupted power supply (UPS) backups for embedded systems.
Skills You'll Learn
Lithium-ion battery charging topologies
DC-DC boost converter design
PCB layout for power electronics
surface-mount device soldering
power management integration
Safety Precautions
Exercise caution when handling Li-ion 18650 batteries; ensure correct polarity during insertion and use proper charging circuits to prevent overheating or short circuits.
Technology Tags
RASPBERRY PI
LI-ION BATTERY
TP4056
MT3608
PCB DESIGN
POWER SUPPLY
HAT
BOOST CONVERTER
Frequently Asked Questions
Depending on the specific wiring of your TP4056 module and boost converter arrangement, simultaneous charge and discharge can draw extra current through the charger; consult your schematic layout to verify if pass-through power is supported.
An 18650 Li-ion cell outputs a maximum of 4.2V when fully charged and drops down to about 3V when depleted. The Raspberry Pi requires a regulated 5V input, so a boost converter is necessary to step that variable lower voltage up to a stable 5V.
No software is required. This is purely a hardware power supply solution that delivers 5V directly to the Raspberry Pi's power pins through physical connections.
Gallery
This page is part of Kitkraft's Project Hub — a curated collection of electronics & robotics projects gathered from the maker community to help students and hobbyists discover and learn to build. Kitkraft does not claim authorship of the original project, and makes no representation as to the accuracy, completeness or safety of third-party source material. The summary and "How It Works" explanation above are AI-generated, rewritten with reference to the original tutorial — not a reproduction of it. Full credit and a direct link to the original source are provided above. If you're the original creator and have a concern about how your work is represented here, please contact us and we'll address it promptly.
 1200mAh 18650 Li-ion Bat – Reliable 3.7V Power Cell
Rs. 129.00
 400 Points Mini Solderless Prototype PCB Breadboard High Quality
Rs. 89.00
 MB102 Adjustable Breadboard Power Supply Module (3.3V & 5V) for Arduino & Raspberry Pi
Rs. 139.00
 Jumper Wire 10 Pin Male To Male 20cm
Rs. 45.00
 Jumper Wire 10 Pin Male To Female 20cm
Rs. 45.00


