This project is sourced from another site, not written by us — this list is our best match of their components against what we stock, not a verified bill of materials. Always check the original blog (linked above) for the actual parts list before buying.
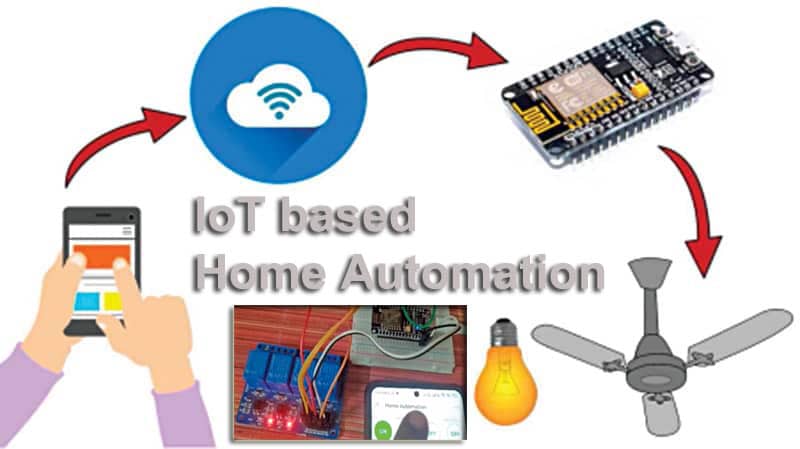
The IoT-based Smart Home Automation System functions by establishing a wireless bridge between the user's mobile device and physical household appliances. At the core of the system is the ESP8266 NodeMCU, a Wi-Fi-enabled microcontroller that connects to a local wireless network. Through this network connectivity, the ESP8266 communicates directly with the Blynk cloud platform. When a user interacts with virtual buttons, sliders, or widgets inside the Blynk App running on a smartphone, control commands are transmitted over the internet to the ESP8266. Upon receiving these digital commands, the microcontroller changes the state of its general-purpose input/output (GPIO) pins. These low-voltage digital signals are then routed to the 4-channel relay module using male-to-female jumper wires. The relay module acts as an electrically operated switch; when triggered by the ESP8266's control signals, its internal electromagnetic coils trip physical switches that can open or close high-power circuits connected to home appliances. Power for the low-voltage control circuit—including the NodeMCU and the relay logic—is supplied reliably via a 5V battery or USB power bank, keeping the microcontroller isolated from power fluctuations while enabling seamless, remote automation of up to four separate devices.
Why Build This
Design and deploy scalable internet-connected residential energy management and remote monitoring systems suitable for smart building integration.
Implement cloud-to-microcontroller communication protocols using the Blynk ecosystem to bridge software interfaces with physical hardware actuators.
Interface low-voltage digital microcontroller logic with multi-channel electromechanical relays to safely control higher-load electrical circuits.
Real-World Application
Energy management in residential buildings, remote appliance control, and smart home lighting automation.
Skills You'll Learn
Wi-Fi microcontroller configuration
Cloud IoT platform integration
Relay module interfacing
Digital GPIO control
Circuit prototyping with jumper wires
Safety Precautions
Exercise caution when working with AC mains voltage connected to the relay module.
Technology Tags
IOT
ESP8266
BLYNK
WI-FI
RELAY MODULE
SMART HOME
HOME AUTOMATION
Frequently Asked Questions
The ESP8266 acts as the central processing unit and Wi-Fi gateway, connecting your physical hardware to the internet and translating commands from the Blynk app into electrical signals.
The NodeMCU operates on low DC voltages (3.3V/5V) and can only handle tiny currents, which is insufficient for powering standard home appliances. The relay module acts as an isolated switch that allows low-voltage digital signals to safely trigger higher-power circuits.
Yes, a 5V battery or power bank is ideal for powering the ESP8266 and the logic side of the relay module, ensuring stable operation without needing a direct wall outlet for the control circuit.
Gallery
This page is part of Kitkraft's Project Hub — a curated collection of electronics & robotics projects gathered from the maker community to help students and hobbyists discover and learn to build. Kitkraft does not claim authorship of the original project, and makes no representation as to the accuracy, completeness or safety of third-party source material. The summary and "How It Works" explanation above are AI-generated, rewritten with reference to the original tutorial — not a reproduction of it. Full credit and a direct link to the original source are provided above. If you're the original creator and have a concern about how your work is represented here, please contact us and we'll address it promptly.
 NodeMCU ESP8266 WIFI development board based on CP2102
Rs. 660.00
 5V 1 Channel Relay Module
Rs. 87.00
 Jumper Wire 10 Pin Male To Male 20cm
Rs. 45.00
 400 Points Mini Solderless Prototype PCB Breadboard High Quality
Rs. 89.00
 MB102 Adjustable Breadboard Power Supply Module (3.3V & 5V) for Arduino & Raspberry Pi
Rs. 139.00
 Jumper Wire 10 Pin Male To Female 20cm
Rs. 45.00


