We stock the boards, sensors and modules this project needs. A full parts list is coming soon — for now, browse our DIY Kits & components or search for Raspberry Pi parts.
This project is sourced from another site, not written by us — this list is our best match of their components against what we stock, not a verified bill of materials. Always check the original blog (linked above) for the actual parts list before buying.
We don't carry yet: Teensy
Microcontroller IC (DIP) / Chip
Laser / LiDAR / ToF Sensor
ADC / DAC (ADS1115 / MCP3008 / MCP4725)
Custom PCB / PCB Fab
024-pixel linear image sensor
Custom stainless steel slot aperture
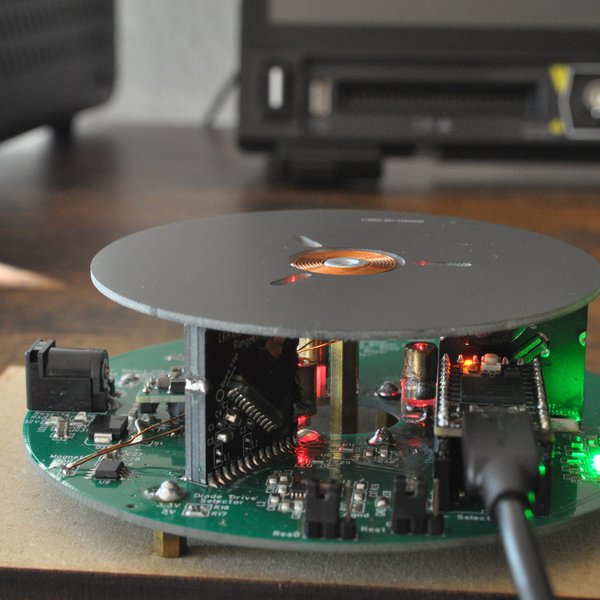
The Measuring Microns with Lasers project operates on the principle of optical triangulation and high-speed linear detection to measure microscopic displacements. At the heart of the system is a 5 mW-class red laser diode that projects a fine beam onto a target surface. Reflected light from the target passes through a custom stainless steel slot aperture—integrated directly into a PCB stencil—which controls the incoming light profile before it strikes an iC-Haus LFH1024 1,024-pixel linear image sensor. Because the position of the reflected light spot shifts on the pixel array relative to the target's micro-displacement, the linear sensor captures this spatial shift at high speeds. The pixel data is rapidly digitized by an ADC1173 8-bit parallel analog-to-digital converter. Managing this rapid data acquisition stream is a powerful Teensy 4 microcontroller running C++ firmware compiled via the Arduino IDE with Teensyduino. The microcontroller processes the high-rate parallel pixel array data, calculates the centroid or displacement metrics, and streams the results over a serial or USB connection to a host computer. On the host side, a Python application utilizing PySide6 provides a responsive graphical live viewer interface, while an NPZ recorder handles data logging for subsequent analysis. By combining high-speed digital sampling with precise optical apertures, the system achieves sub-micron measurement resolution without relying on bulky or expensive precision camera lenses.
Why Build This
Design and deploy a high-speed optical metrology instrument capable of over 4,000 scans per second for industrial quality control applications.
Implement high-throughput data acquisition pipelines interfacing high-speed parallel ADCs with modern microcontrollers like the Teensy 4.
Develop custom desktop visualization and data logging software using Python, PySide6, and NPZ file formats for real-time sensor monitoring.
Real-World Application
High-precision surface metrology, micro-displacement sensing, industrial inspection, and quality control.
Skills You'll Learn
High-speed data acquisition
parallel ADC interfacing
optical triangulation principles
microcontroller firmware optimization
Python GUI development with PySide6
custom PCB integration
Safety Precautions
Avoid direct eye exposure to the 5 mW class red laser diode.
Technology Tags
LASER TRIANGULATION
LINEAR IMAGE SENSOR
IC-HAUS LFH1024
TEENSY 4
EDMA
PYTHON
PYSIDE6
PCB DESIGN
METROLOGY
Frequently Asked Questions
The Raspberry Pi 4 serves as the host computer running the Python-based PySide6 live viewer GUI and NPZ data recorder, while the Teensy 4 handles the real-time, high-speed data acquisition from the ADC and linear sensor.
No. This system relies on a custom stainless steel slot aperture integrated into a PCB stencil alongside a linear image sensor and laser triangulation, bypassing the need for complex, precision optical lens assemblies.
You will need the Arduino IDE with Teensyduino for writing and flashing C++ firmware to the microcontroller, and Python with PySide6 and scientific libraries for the host-side visualization and data recording software.
Gallery
This page is part of Kitkraft's Project Hub — a curated collection of electronics & robotics projects gathered from the maker community to help students and hobbyists discover and learn to build. Kitkraft does not claim authorship of the original project, and makes no representation as to the accuracy, completeness or safety of third-party source material. The summary and "How It Works" explanation above are AI-generated, rewritten with reference to the original tutorial — not a reproduction of it. Full credit and a direct link to the original source are provided above. If you're the original creator and have a concern about how your work is represented here, please contact us and we'll address it promptly.
Kitkraft Project Hub — curated from the maker community, credited at the source.