Project Hub
/Robotics & Autonomous Systems/AGV & Industrial Rovers/OrbitClock – a Tiny Space IoT Environmental Clock
Intermediate
ESP32
₹1,500 – ₹5,000
3 – 6 Hours
Partial Kit
OrbitClock – a Tiny Space IoT Environmental Clock
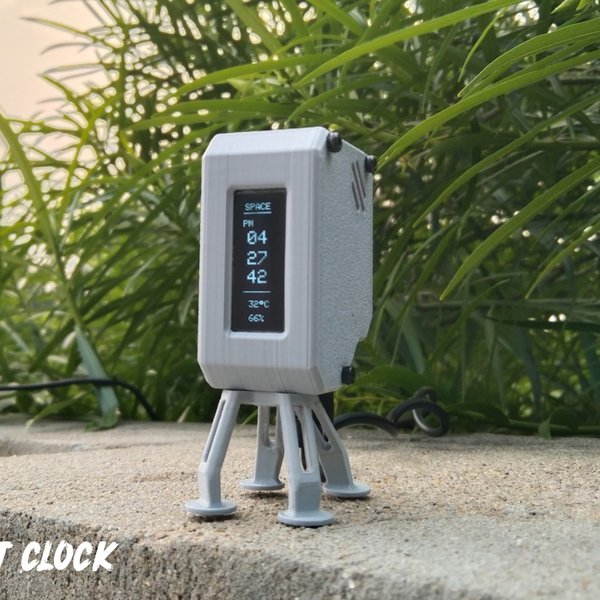
Meet OrbitClock, a tiny satellite-inspired IoT clock designed in Autodesk Fusion 360 and powered by the DFRobot Beetle ESP32-C3 to display NTP time and environmental data.
This project is sourced from another site, not written by us — this list is our best match of their components against what we stock, not a verified bill of materials. Always check the original blog (linked above) for the actual parts list before buying.
The OrbitClock operates by integrating microcontroller processing, wireless networking, local environmental sensing, and visual output into a compact, battery-powered IoT device. At the heart of the system is the DFRobot Beetle ESP32-C3, which utilizes its built-in Wi-Fi capabilities to connect to a local wireless network. Once connected, the microcontroller queries a Network Time Protocol (NTP) server over the internet to retrieve accurate, synchronized time data without requiring an onboard Real-Time Clock module. Simultaneously, the DFRobot SHTC3 sensor interfaces with the ESP32-C3 to continuously measure ambient temperature and relative humidity. The SHTC3 communicates its environmental readings to the microcontroller using the I2C protocol, allowing the system to process both time and sensor metrics concurrently. After formatting this data, the ESP32-C3 drives a small 0.91-inch OLED display to render the current time alongside the live environmental statistics. All of these electronic components—including the microcontroller, sensor, display, and a compact 350 mAh lithium polymer battery providing untethered portable power—are housed securely inside a custom satellite-inspired enclosure built from 3D printed parts, specifically Housing.stl, Cover.stl, and Legs.stl. Programming and software deployment are handled via the Arduino IDE or a compatible ESP32-C3 development environment, while the mechanical structure can be optionally modified using Autodesk Fusion 360.
Why Build This
Serves as an undergraduate-level engineering project to demonstrate practical IoT device integration, wireless time synchronization via NTP, and compact embedded systems design.
Functions as a desktop environmental monitor that tracks ambient temperature and humidity while displaying synchronized internet time.
Provides a hands-on exercise in combining custom 3D printed mechanical enclosures with modern microcontroller platforms and surface-mounted digital sensors.
Real-World Application
Useful as a desk clock and environmental monitor, as well as a demonstration of IoT time synchronization and compact enclosure design.
Skills You'll Learn
Wi-Fi network connection and NTP time synchronization
I2C sensor communication
OLED display rendering
compact battery power management
3D printed enclosure integration
Safety Precautions
Exercise caution when working with lithium polymer batteries and soldering electronic components.
Technology Tags
ESP32-C3
IOT
NTP TIME SYNC
OLED DISPLAY
SHTC3 SENSOR
3D PRINTING
FUSION 360
WI-FI
Frequently Asked Questions
No, the ESP32-C3 connects to Wi-Fi to fetch accurate time automatically via Network Time Protocol (NTP) servers.
Yes, you can use Autodesk Fusion 360 to alter the provided CAD parts (Housing.stl, Cover.stl, and Legs.stl) before 3D printing.
You can use the Arduino IDE or any other compatible programming environment designed for the ESP32-C3 platform.
Gallery
This page is part of Kitkraft's Project Hub — a curated collection of electronics & robotics projects gathered from the maker community to help students and hobbyists discover and learn to build. Kitkraft does not claim authorship of the original project, and makes no representation as to the accuracy, completeness or safety of third-party source material. The summary and "How It Works" explanation above are AI-generated, rewritten with reference to the original tutorial — not a reproduction of it. Full credit and a direct link to the original source are provided above. If you're the original creator and have a concern about how your work is represented here, please contact us and we'll address it promptly.
Kitkraft Project Hub — curated from the maker community, credited at the source.
 ESP32-C3 Development Board with Berg Pins - Unsoldered
Rs. 390.00
 0.96 Inch I2C/IIC 4pin OLED Display Module White
Rs. 349.00
 400 Points Mini Solderless Prototype PCB Breadboard High Quality
Rs. 89.00
 MB102 Adjustable Breadboard Power Supply Module (3.3V & 5V) for Arduino & Raspberry Pi
Rs. 139.00
 Jumper Wire 10 Pin Male To Male 20cm
Rs. 45.00
 Jumper Wire 10 Pin Male To Female 20cm
Rs. 45.00


