Project Hub
/Robotics & Autonomous Systems/Robotic Arms & Grippers/Turning a 2 ton robot into a 3D-printer
Advanced
ARDUINO
> ₹15,000
> 3 Days
Partial Kit
Turning a 2 ton robot into a 3D-printer
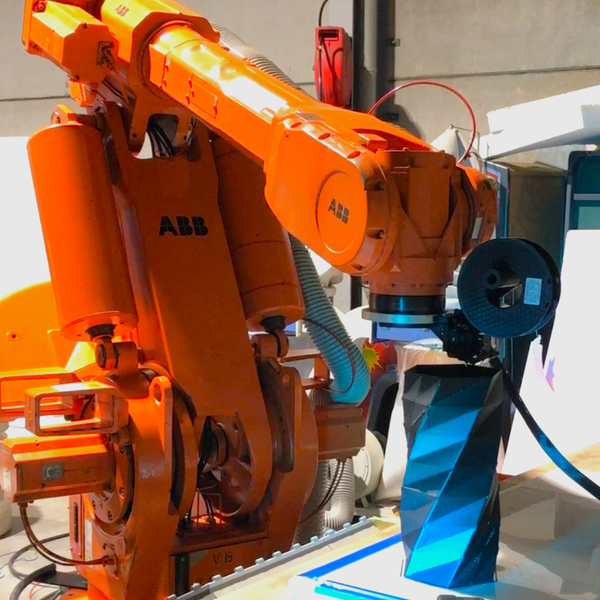
An industrial ABB IRB6400 robot arm is converted into a large-scale 3D printer using a custom bracket, a direct-drive extruder, and an Arduino RAMPS controller.
We stock the boards, sensors and modules this project needs. A full parts list is coming soon — for now, browse our DIY Kits & components or search for Arduino parts.
This project is sourced from another site, not written by us — this list is our best match of their components against what we stock, not a verified bill of materials. Always check the original blog (linked above) for the actual parts list before buying.
We don't carry yet: Arduino Mega
3D Printed Parts / Filament / Printer
ABB IRB6400 Industrial Robot
Creality Sprite Pro Direct Drive Extruder
RAMPS 1.4 Board
Spool Holder
RevoPoint Metro Y 3D-scanner
This advanced manufacturing system repurposes a heavy-duty ABB IRB6400 industrial robot arm to function as a large-scale 3D printer. The conversion relies on integrating a Creality Sprite Pro Direct Drive Extruder, mounted via a custom bracket, onto the end-effector of the robotic arm to handle polymer deposition using PLA filament. To control the extrusion process and coordinate movement, the hardware architecture centers around an Arduino Mega 2560 paired with a RAMPS 1.4 shield. Standard slicing software such as Prusa Slicer or Orca Slicer generates conventional G-code for the print job, which is then managed through Repetier Host. Because an industrial robot understands RAPID code rather than standard desktop 3D printer G-code, a custom coordinate-streaming script translates the toolpath instructions in real-time, commanding the ABB IRB6400's multi-axis joints to follow the translated trajectory while the Arduino RAMPS board simultaneously regulates the extruder motor and hotend temperature. Optionally, a RevoPoint Metro Y 3D-scanner can be used beforehand to scan physical models, bridging the digital-to-physical workflow for oversized additive manufacturing tasks.
Why Build This
Repurpose legacy industrial automation equipment into modern, large-scale additive manufacturing cells for oversized rapid prototyping.
Master advanced kinematics translation by bridging standard desktop 3D printing slicing pipelines with industrial robot programming languages.
Integrate heterogeneous hardware systems by interfacing microcontrollers like the Arduino Mega and RAMPS 1.4 with heavy industrial robotics.
Real-World Application
Large-scale additive manufacturing, rapid prototyping of oversized parts, and repurposing legacy industrial automation equipment for modern fabrication.
Skills You'll Learn
Industrial robot kinematics
G-code to RAPID translation
microcontroller-based thermal and motor control
multi-axis system integration
large-scale additive manufacturing workflows
Safety Precautions
Exercise extreme caution when working with heavy industrial machinery, high-voltage equipment, and moving robotic arms capable of exerting high forces.
Technology Tags
3D-PRINTING
ABB ROBOT
ROBOTICS
IRB6400
INDUSTRIAL ROBOT ARM
3D-SCANNER
CREALITY SPRITE PRO
RAMPS
ARDUINO MEGA
G-CODE
ABB RAPID
Frequently Asked Questions
Standard G-code cannot be read natively by an ABB IRB6400. A custom coordinate-streaming script is required to translate the G-code toolpaths into the ABB RAPID language so the robot arm can execute the print trajectory.
The Arduino Mega running the RAMPS 1.4 shield acts as the subsystem controller dedicated to managing the Creality Sprite Pro extruder, including driving the filament motor and regulating the hotend temperatures.
Yes, standard slicers like Prusa Slicer, Orca Slicer, and Repetier Host are used to generate the initial toolpaths and slice models, provided the output is processed through your custom translation pipeline.
Gallery
This page is part of Kitkraft's Project Hub — a curated collection of electronics & robotics projects gathered from the maker community to help students and hobbyists discover and learn to build. Kitkraft does not claim authorship of the original project, and makes no representation as to the accuracy, completeness or safety of third-party source material. The summary and "How It Works" explanation above are AI-generated, rewritten with reference to the original tutorial — not a reproduction of it. Full credit and a direct link to the original source are provided above. If you're the original creator and have a concern about how your work is represented here, please contact us and we'll address it promptly.
Kitkraft Project Hub — curated from the maker community, credited at the source.