We stock the boards, sensors and modules this project needs. A full parts list is coming soon — for now, browse our DIY Kits & components or search for Analog / Discrete parts.
This project is sourced from another site, not written by us — this list is our best match of their components against what we stock, not a verified bill of materials. Always check the original blog (linked above) for the actual parts list before buying.
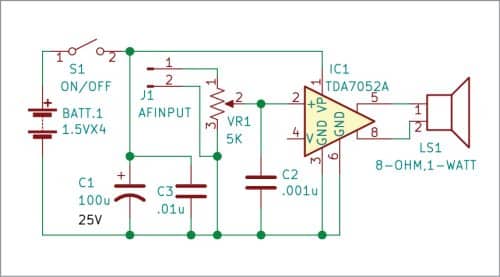
The 1-Watt Single-Channel Audio Amplifier is centered around the TDA7052A audio power amplifier IC, housed safely in an 8-pin IC socket on a Veroboard or custom PCB. The circuit operates from a 6V DC power supply, which is constructed using four 1.5V batteries connected in series. An input audio signal is routed through a 5k potentiometer, which acts as a volume control by varying the amplitude of the signal delivered to the amplifier input. Power supply decoupling and stability are handled by a combination of a 100uF 25V electrolytic capacitor and a 0.01uF ceramic capacitor placed across the power rails to filter out low-frequency ripple and high-frequency noise respectively. Once the TDA7052A IC receives the conditioned input signal and stable power, it amplifies the audio waveform to a 1-watt output level. This amplified electrical signal is then driven directly through 2-pin connectors to an 8-ohm 1W speaker, converting the electrical audio signals into audible sound waves.
Why Build This
Ideal for undergraduate engineering students looking to understand the practical application of analog monolithic power amplifiers.
Provides a functional audio driver circuit suitable for integration into custom portable audio devices or DIY intercom prototypes.
Demonstrates the importance of power supply decoupling, volume attenuation via potentiometers, and impedance matching with an 8-ohm speaker.
Real-World Application
Portable audio devices, mini speakers, DIY intercoms, and small headphone amplifiers.
Skills You'll Learn
Analog circuit assembly
audio power amplification principles
volume control integration
power supply decoupling techniques
PCB or Veroboard layout
Safety Precautions
Ensure proper polarity when connecting the 6V battery to prevent damage to the IC.
Technology Tags
AUDIO AMPLIFIER
TDA7052
PCB DESIGN
ANALOG ELECTRONICS
DIY AUDIO
VOLUME CONTROL
Frequently Asked Questions
They act as power supply decoupling capacitors to stabilize the 6V voltage rail by filtering out low-frequency fluctuations and high-frequency noise.
You should strictly adhere to the specified 6V battery supply (four 1.5V batteries) to prevent exceeding the voltage ratings of the TDA7052A IC and causing permanent damage.
The 5k potentiometer functions as a volume control, allowing you to manually adjust the strength of the audio signal sent into the amplifier input.
Gallery
This page is part of Kitkraft's Project Hub — a curated collection of electronics & robotics projects gathered from the maker community to help students and hobbyists discover and learn to build. Kitkraft does not claim authorship of the original project, and makes no representation as to the accuracy, completeness or safety of third-party source material. The summary and "How It Works" explanation above are AI-generated, rewritten with reference to the original tutorial — not a reproduction of it. Full credit and a direct link to the original source are provided above. If you're the original creator and have a concern about how your work is represented here, please contact us and we'll address it promptly.