This project is sourced from another site, not written by us — this list is our best match of their components against what we stock, not a verified bill of materials. Always check the original blog (linked above) for the actual parts list before buying.
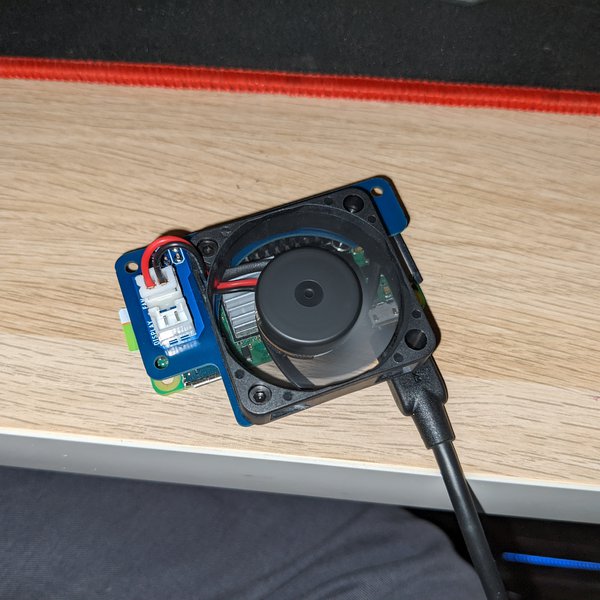
The Raspberry Pi Zero 2 W Active Cooling project manages thermal output in compact computing setups by combining passive and active cooling elements integrated via a custom printed circuit board (BE_SecureFrame.brd). The Raspberry Pi Zero 2 W generates thermal energy during intensive computational and graphical processes, which can lead to thermal throttling and reduced processing performance. To mitigate this, passive heat sinks are mounted directly to the main processor to absorb and dissipate initial heat. Simultaneously, a dedicated cooling fan provides forced-air convection to continually clear warmed air away from the board. Electrical power and control for the fan are routed through a custom-designed PCB featuring a JST connector, ensuring a secure, low-profile connection that integrates neatly with the single-board computer's footprint. Design files for the custom PCB are prepared and modified using Autodesk Eagle, allowing undergraduate engineering students to understand how custom hardware shields and breakout boards interface physically and electrically with compact computing hardware. By combining a physical frame for secure mounting, heat sinks for conduction, a fan for forced convection, and a custom PCB for power distribution, the system maintains optimal operating temperatures without requiring bulky aftermarket enclosures.
Why Build This
Prevent thermal throttling and maintain peak processing performance during intensive graphical tasks and edge computing operations.
Gain practical experience designing custom hardware breakout boards and power distribution interfaces using industry-standard CAD tools like Autodesk Eagle.
Implement reliable thermal management solutions for compact embedded deployments such as media centers and smart photo frames.
Real-World Application
Thermal management for compact single-board computer setups used in media centers, smart photo frames, and edge computing nodes.
Skills You'll Learn
Custom PCB design
board layout routing with Autodesk Eagle
thermal management integration
hardware prototyping
power distribution via JST connectors
Safety Precautions
No specific precautions noted for this build — always follow general electronics safety practices.
Technology Tags
RASPBERRY PI
PCB DESIGN
EAGLE CAD
ACTIVE COOLING
THERMAL MANAGEMENT
POWER BREAKOUT
Frequently Asked Questions
The custom PCB (BE_SecureFrame.brd) provides a dedicated, secure power routing solution using a JST connector, ensuring clean power distribution and a mechanically stable mount for the cooling hardware without cluttering standard GPIO pins.
The project specifically relies on Autodesk Eagle for the provided design files; using alternative software would require you to recreate the schematic and board layout from scratch.
The custom PCB and frame are engineered specifically for the form factor of the Pi Zero 2 W to provide thermal management while keeping critical interfaces accessible, though you should verify clearance based on your specific layout in Autodesk Eagle.
Gallery
This page is part of Kitkraft's Project Hub — a curated collection of electronics & robotics projects gathered from the maker community to help students and hobbyists discover and learn to build. Kitkraft does not claim authorship of the original project, and makes no representation as to the accuracy, completeness or safety of third-party source material. The summary and "How It Works" explanation above are AI-generated, rewritten with reference to the original tutorial — not a reproduction of it. Full credit and a direct link to the original source are provided above. If you're the original creator and have a concern about how your work is represented here, please contact us and we'll address it promptly.
 Raspberry Pi 3 - Model B+ 1.4Ghz 64-bit quad-core Processor with 1 GB Ram (Original)
Rs. 9,810.00
 DC Motor Plastic Fan Blade
Rs. 19.00
 400 Points Mini Solderless Prototype PCB Breadboard High Quality
Rs. 89.00
 MB102 Adjustable Breadboard Power Supply Module (3.3V & 5V) for Arduino & Raspberry Pi
Rs. 139.00
 Jumper Wire 10 Pin Male To Male 20cm
Rs. 45.00
 Jumper Wire 10 Pin Male To Female 20cm
Rs. 45.00


